Managing Projects and Feeds
Creating Projects
Projects are created from the main Project listing page. Click the New Project button to create a new Project; a row for the new Project will appear in the table. Type a name and click the check button (or hit Enter/Return) to finish creating the Project.

Managing Projects
Clicking on a project in the main project listing will take you to the detailed project profile page:

The Settings tab can be expanded to reveal optional properties that can be specified for the project. These include the location of the project's geographic coverage area (specified as a rectangular region) and the default time zone. These values, when provided, are used to populate the corresponding feed-level properties when creating new feeds within this project.
Creating a Feed Source
To the left of the Project Settings panel is the Feed Sources panel. Feed Sources are the core of a project, and are documented in more detail below.

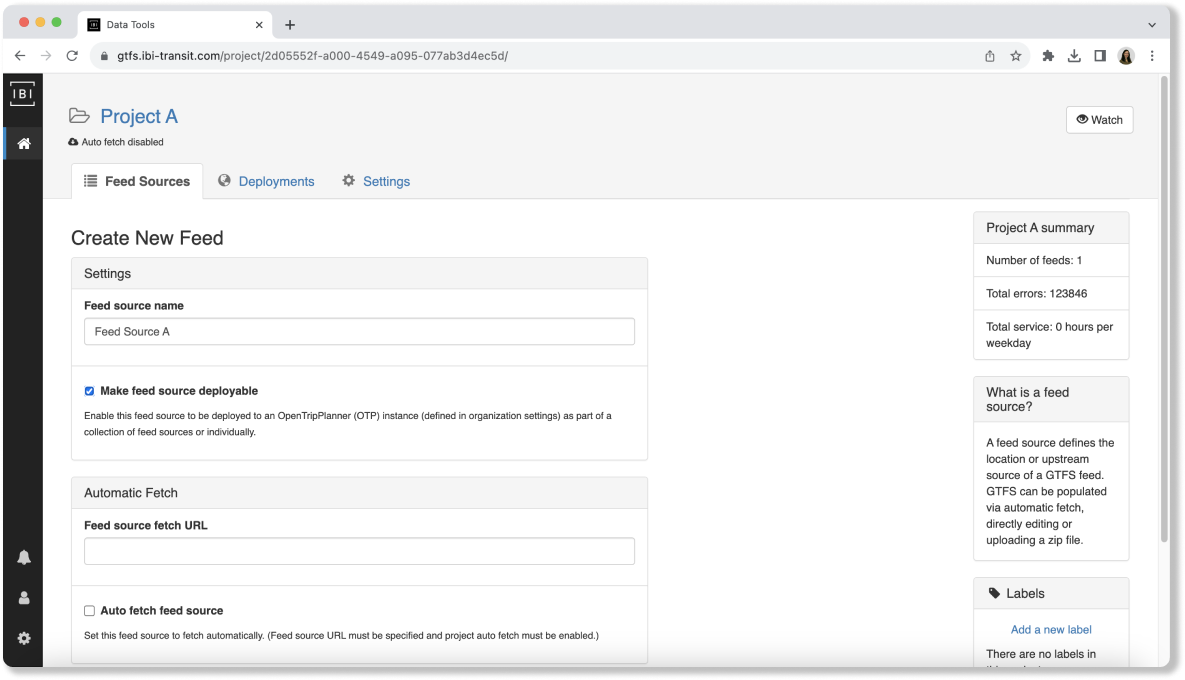
Feed Sources are created from a Project's main profile page. Click the +New button from the Actions dropdown to create a new feed; Specify a name and optional feed source URL and click Save. You may also adjust whether to automatically fetch the feed from the source URL and to make the feed deployable.
Managing Feed Sources
After a Feed Source has been created, it will appear in the Project's table of Feed Sources. From this table, a basic summary of information for the feed is presented (including if the latest version has expired and how many validation issues it has).
To access the Feed Source Profile for this feed, click its name.
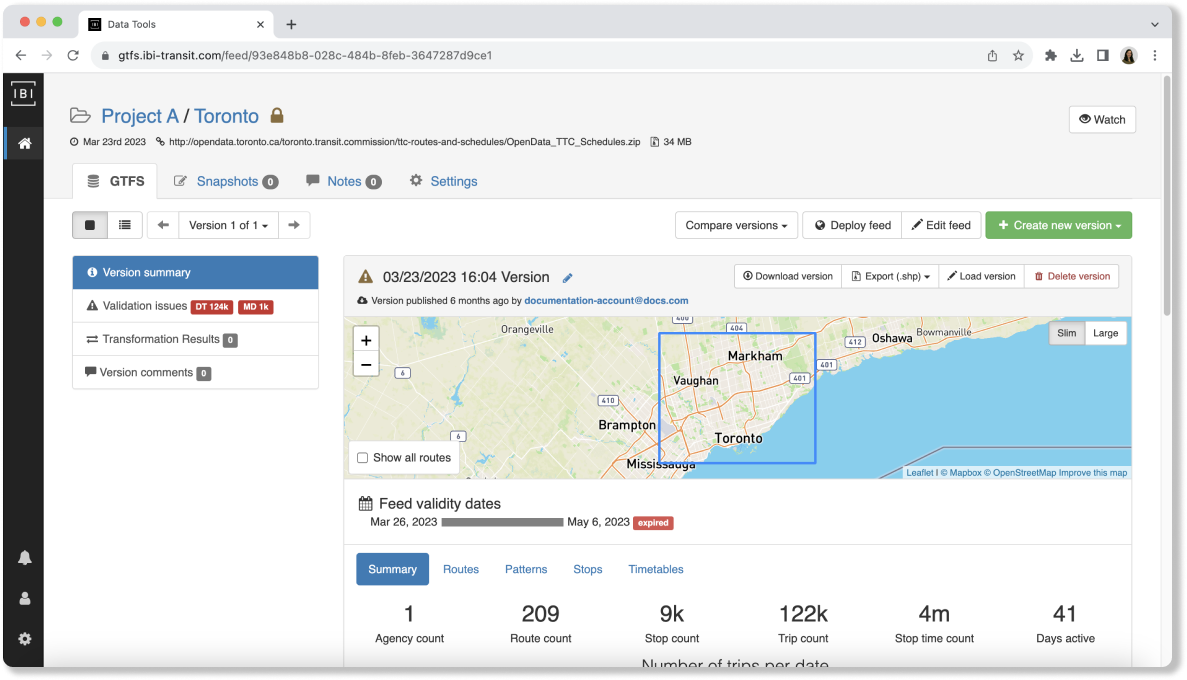
At the top of the page is a set of tabs, which include:
- GTFS: Main point of entry for Feed Source which includes:
- Feed Version Navigator (covered in more detail below)
- Feed Version Summary - view feed info and discover information about routes, patterns and stops
- Validation issues - view and filter list of validation issues
- Version comments - leave and view comments specific to a Feed Version
- Snapshots: List of Editor snapshots (or save points)
- Notes: A place to leave and view comments specific to this Feed Source
- Settings: Access to Feed Source settings
- Editing basic Feed Source properties such as name, fetch URL, and public visibility
- Viewing/editing settings provided by custom extensions
- Deleting a Feed Source (for users with sufficient permissions) in the Danger zone properties.
Creating Feed Versions
Feed Versions are created from the main Feed Source profile page. There are three methods for creating new versions:
-
Manually Upload a File: Click
Uploadfrom the+ Create new versiondropdown to click a GTFS file from your local machine. -
Fetch From A Remote URL: Click
Fetchfrom the+ Create new versiondropdown. Note: to fetch a new version, the "Feed source fetch URL" property must be set to a valid GTFS URL underFeed Source > Settings. -
Import From the GTFS Editor: Click
From snapshotfrom the+ Create new versiondropdown. The list of snapshots should now be visible showing any available snapshots of the feed in the Editor. Select the desired snapshot by clicking the "Publish" button to publish the snapshot as a new version. -
Service Period Merge (certain TRANSIT-data-tools configurations only): If a Feed Source has two or more Feed Versions, a new Feed Version can be created by merging two versions representing a transit agency's service over different time periods. While viewing a particular Feed Version, click
Merge with version(underneath the map view) to click which past version you would like to merge with. -
Regional Merge: For Projects that contain multiple Feed Sources across a region, it can be useful to merge multiple transit agencies together into a combined GTFS feed for the entire region. While viewing a Project's list of Feed Sources, click
Actions > Merge allto produce a combined GTFS file for all Feed Sources.
Note: when uploading or fetching a feed, and the file being uploaded or fetched is not different from the latest version, no new Feed Version will be created.
Feed Transformations
TRANSIT-data-tools now supports Feed Transformations, which can automatically apply a set of changes to each new GTFS feed loaded into the system. This feature is especially useful for applying repeatable changes to, or inserting supplementary files into, GTFS feeds that require enhancement. It serves as a critical stopgap for improving GTFS data from systems that cannot be modified, such as scheduling software with a rigid export format. The currently supported transformation types are:
-
Replace File From Version - any file in an incoming GTFS (e.g.,
feed_info.txt) can be overwritten or inserted with a file extracted from a previously loaded feed version. -
Replace File From String - any file in an incoming GTFS (e.g.,
feed_info.txt) can be overwritten or inserted with user-defined CSV data. -
Normalize Field: Standardization of values within a specific GTFS field according to preset rules.
-
Preserve Custom Fields: Prevents custom, user-added fields in GTFS data from getting lost.
-
Add Custom File: Includes custom files in the GTFS data.
-
Normalize Field Transformation - values in fields can be processed in bulk and normalized, so that features such as spacing or abbreviation spelling are applied consistently throughout the feed.
Configuring Feed Transformations
Follow the steps below to configure Feed Transformations for an existing Feed Source:
- Select a Feed Source and click
Settings > Feed Transformations. - From here, click
Add transformationto begin creating a new set of rules for incoming GTFS feeds. Your first ruleset will automatically apply to GTFS that is fetched automatically and manually uploaded, but this can be changed for each ruleset to apply to any of the retrieval methods listed in Creating Feed Versions. - Click
Add step to transformationto select a transformation type and fill in the required fields for each type. Multiple transformations can be specified and each will be applied to the incoming GTFS file in the order in which they are defined. The Transformations Editor will highlight any missing or invalid setting.

The configuration parameters for each transformation are described in the next sections.
Replace File From Version Transformation
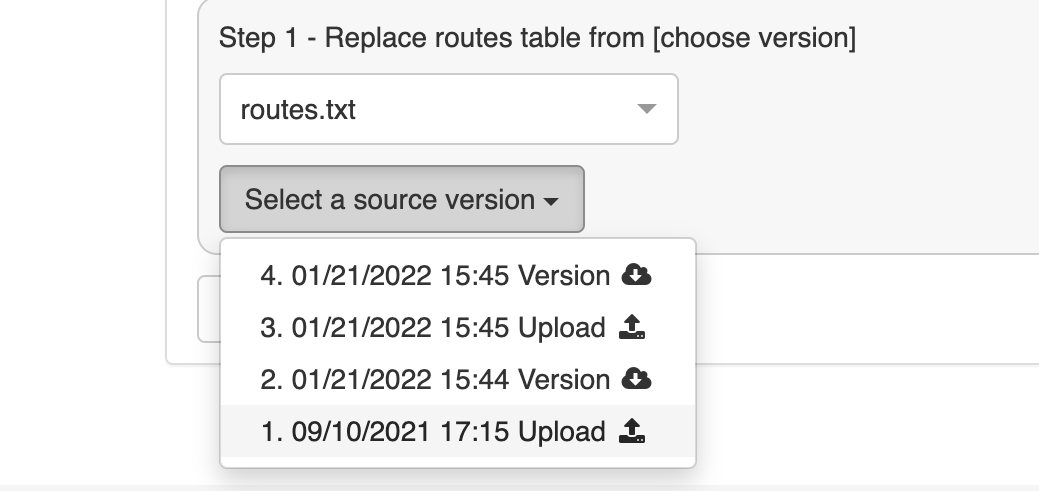
- Select the file or table to replace.
- Select the feed version from which the desired data for the selected table will come from (see screenshot below).
Replace File From String Transformation
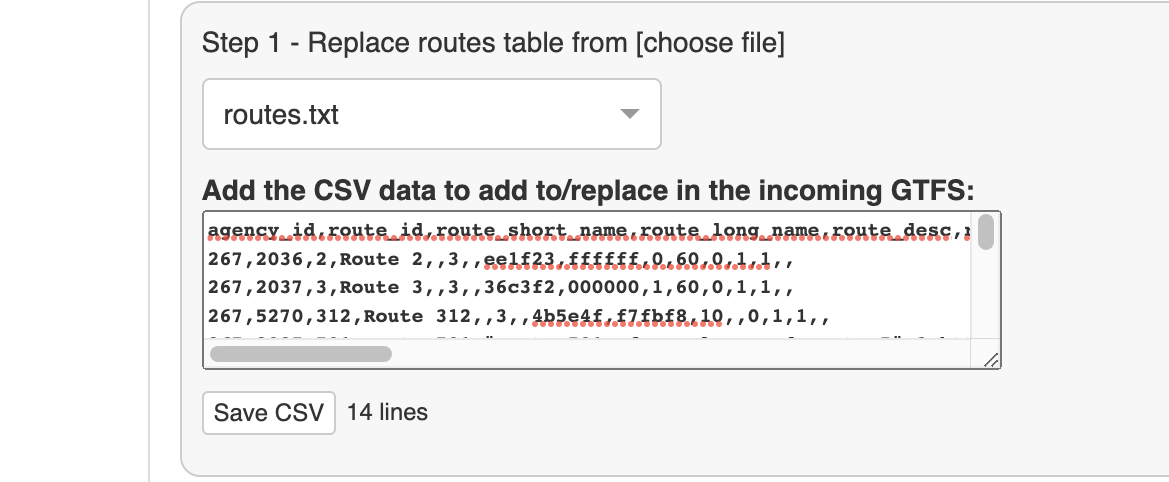
- Select the file or table to replace.
- Enter or paste the desired CSV data for the table to replace (see screenshot below).
- Click
Save CSVfor the entered CSV to take effect.
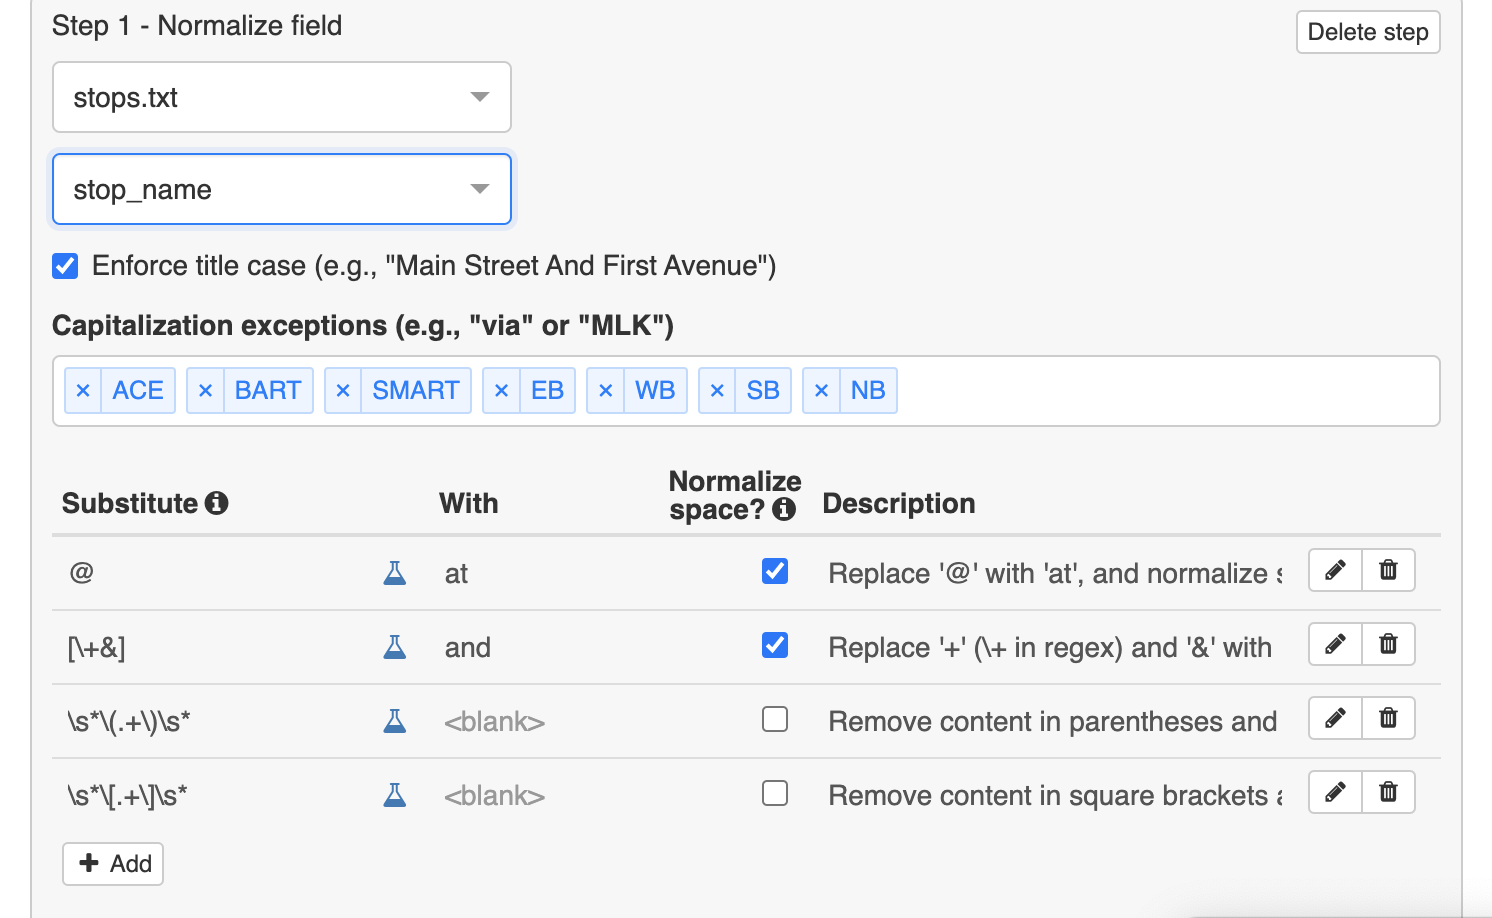
Normalize Field Transformation
The Normalize Field Transformation is configured as follows (also see screenshot following the steps):
- Select the file or table to replace.
- Select the field of the selected table to normalize.
- If checked,
Enforce Title Casewill convert all words to Title Case regardless of how they appear in the original feed file. This is useful in stop or route names. - You can enter or remove
Capitalization Exceptions, especially for acronyms (all-caps) or prepositions (lower-case). The exceptions will appear in the processed feed as entered. Some exceptions may already be pre-defined by your administrator. - You can enter substitutions that will replace a search term with a replacement term. There is one substitution per row in the substitutions table. Click the "pencil" or "trash" button to modify or delete the corresponding row, respectively. Click "Add" to add a new substitution.
- The search term is defined using a regular expression. Use the "potion" button to test the search term (a separate website will open to let you test how the search term behaves with various content).
- The replacement term is normal text that will replace instances of the search term.
- If checked, "Normalize space" will add or shrink the space surrounding the text to substitute to one space. For example, if "@" were replaced with "and", then "12th@ West" would become "12th and West".
- You can enter an optional description of what the substitution performs.
Viewing the Feed Transformation Summary
After configuring all the Feed Transformations, you can import a new GTFS file using one of the retrieval methods you specified for your ruleset. Once the GTFS file has been processed, a summary of the transformations is accessible by hovering over the wrench icon visible in the Feed Version panel.
![]()
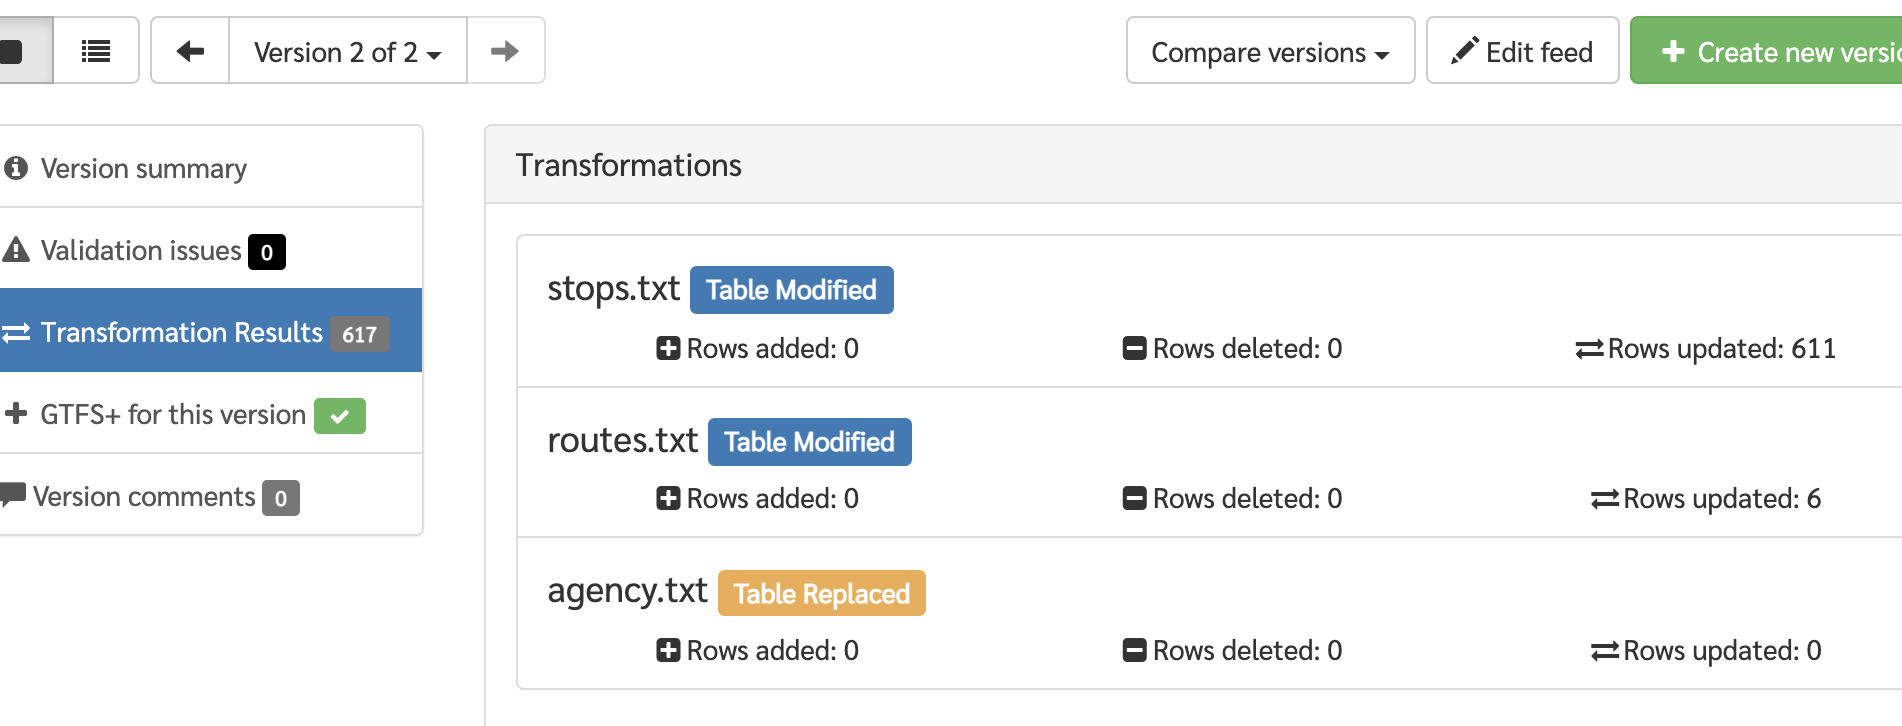
A more in depth summary is available under the Transformation Results tab on the left sidebar. This panel will show you the modifications made to each file in the feed, along with how many rows were added, deleted, or modified.
Viewing and Managing Feed Versions
The Feed Version navigator allows you to browse through all available versions of a given feed using the ← and → buttons (or view a list of all versions). You can also use this interface to:
- Download a Feed Version to your local machine as a GTFS data file,
- Export the route patterns or stops as a shapefile (.shp),
- Merge two Feed Versions into a single version (MTC only),
- Publish a Feed Version externally (MTC only),
- Load a version into the Editor, and
- Delete a Feed Version from the Data Manager. (Note: deleting a Feed Version cannot be undone.)
To the left of the navigator is a list of views available for the currently active version. These views include basic feed statistics, the detailed feed validation report, and any user comments specific to this feed. See Feed Version Summary for more.